WinDeveloper O365 Mailer FREE for 1 Year

Check the following frequently asked questions to quickly resolve/answer common questions. Choose your question type:
Technical FAQs
Sales/Licensing FAQs
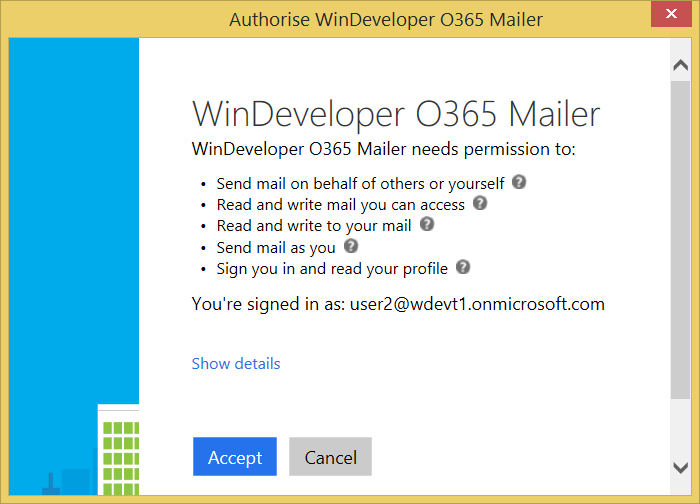
Which Office 365 permissions does the Mailer require? On submitting our first mailing we will be prompted to login to Office 365. Next the Authorisation dialog prompts us to grant the mailer the necessary permissions for it to work. Specifically, these permissions must be granted:
Click Accept for the permissions to be granted and go ahead with the mailing.
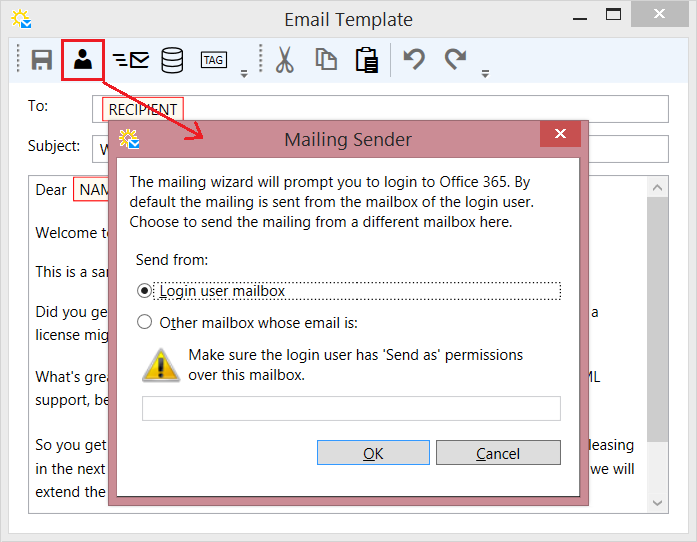
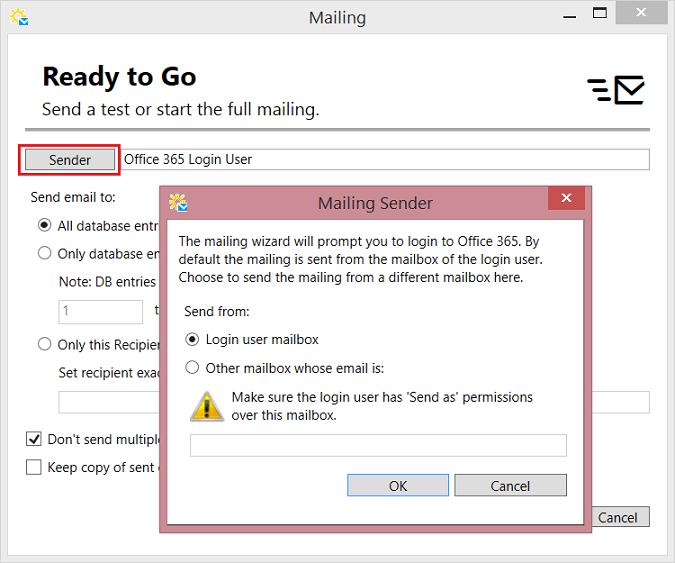
How do I send a Mailing from a Shared Mailbox? With O365 Mailer, users can access all mailboxes for which they have Send As permissions. Many organizations create mailboxes dedicated to specific tasks. One mailbox could be dedicated to newsletters, another for sales follow-up etc. By default mailings are sent from the primary mailbox of the O365 login user. However this can be overridden. From the template editor toolbar just click on the Sender button. At the Mailing Sender dialog click on
Alternatively we can set the sender from the Mailing Wizard. Just follow the wizard up to the
Sending from a Shared Mailbox is not working When sending a mailing from a Shared Mailbox it is important to make sure that:
Testing Send As permissions from OWA - Login to OWA using the O365 credentials in use with the O365 Mailer. From the top-right corner, open the account settings and select
If the necessary permissions are in place, the mailbox should open. Send a test email and confirm that this is correctly delivered.
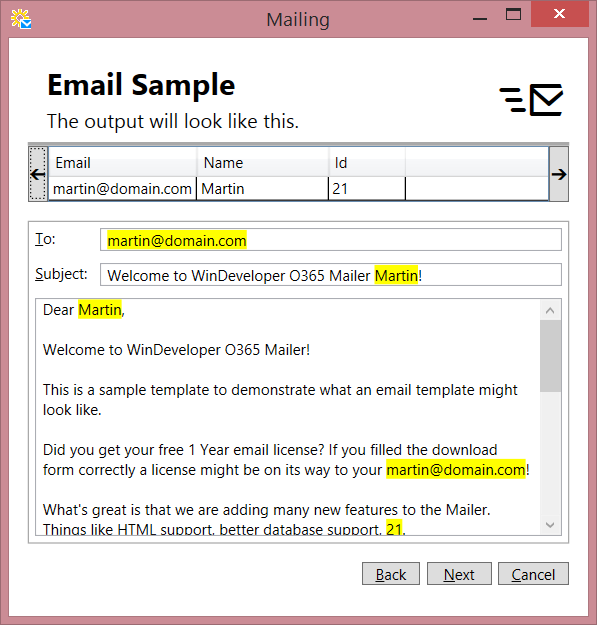
How will the Template Tags look like in the final email? A database may include various data types. Textual data is inserted into the email "as is". Other types, such as dates, require a conversion for them to be inserted into the email. It is a good idea to check what the mailing is going to look like before this is sent. For this purpose the Mailing Wizard includes an 'Email Sample' step. This allows us to scroll through the first 50 emails showing exactly how the data is converted and inserted into the email. To see the sample, select the email template and launch the Mailing Wizard as if to submit it for delivery. Move the Wizard forward up to the 'Email Sample' step. Click on the left/right arrows at the top to scroll through different emails.
In the above example some of the inserted data doesn't look right. This can happen if a mistake is done when configuring tags.
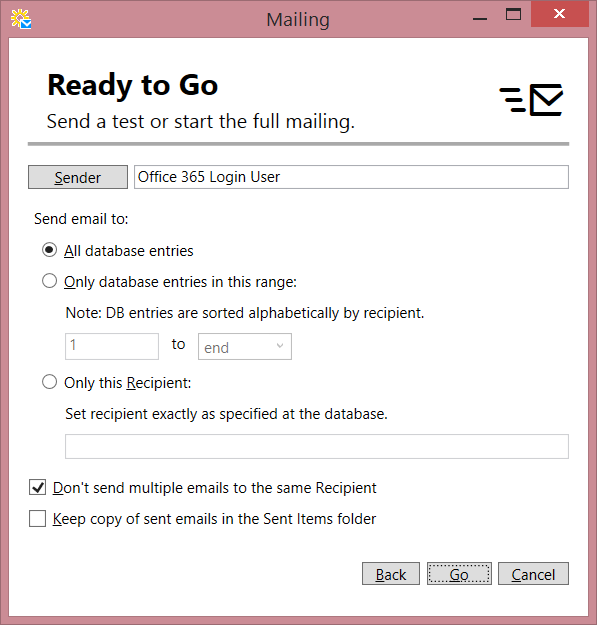
How do I test a Mailing before sending? It is always wise to test an important mailing before going ahead with the full mailing. Just looking at an offline Email Sample is not enough. The sample only shows what the subject and body are going to look like. A complete test should send out a few emails. We should also be able to look at the received email to confirm that everything is fine. Apart for the content, here we want to confirm that the mailing sender is correct and that permissions won't block us from submitting the full mailing. The Mailing Wizard includes some helpful tools for this purpose. In the last
At the mailing database it is always a good idea to have a few recipients reserved for testing. From Alternatively we could choose Another feature useful for testing is available at the same Wizard page through the checkbox
My data needs converting before inserting into the email The O365 Mailer allows us to see how the data is going to look like when inserted into the email template. This is explained in: How will the Template Tags look like in the final email? Sometimes the default conversion is not good enough. Other times we might need more complex logic. For example we might want to merge multiple data fields, or we might want to pull data from multiple tables. In these cases the best solution is to use Database Views. Views bring the power of TSQL, giving us a lot of flexibility. We can now directly set the data to be inserted instead of relying on the O365 Mailer data conversions. At the Mailer we just configure the mailing template to pull the data from the View instead of the database Table.
I need to keep a copy of Sent emails By default the O365 Mailer automatically deletes sent emails. In this way we avoid flooding sender mailboxes with large mailings. However it is sometimes useful to keep a copy of sent emails. We might be testing a mailing, keeping the sent emails enables us to verify what is being sent. Other times we might simply need the emails for record keeping. In these cases we instruct the Mailer to keep a copy of sent emails in the Sent Items folder. At the Mailing Wizard, the last
Can I break a mailing into batches? When dealing with large mailings it is sometimes desirable to break it into smaller batches and send these separately. The Mailing Wizard provides the ability to do this but there is a catch we need to be aware of. At the Mailing Wizard, move forward to the
This approach has one limitation. The Wizard allows us to automatically filter repeated recipient addresses. This is done by setting the checkbox Database Views can be helpful in solving this problem. The View could implement duplicate recipient filtering directly, relieving the Mailer from this task. We can then safely use the Wizard paging functionality without worries.
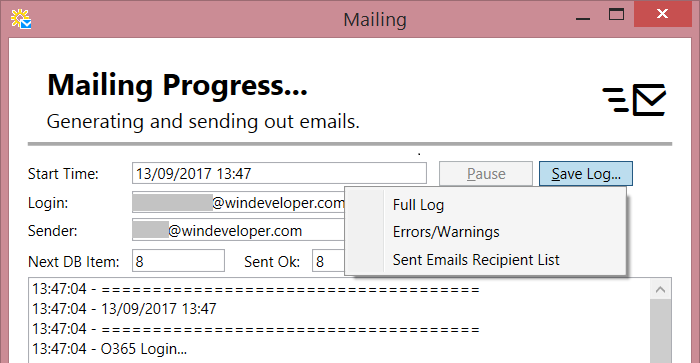
How will I know which emails were sent and which failed? Large mailings can easily include thousands of emails. Monitoring the emails being sent from the Wizard interface isn't practical. The simplest solution is to let the mailing run and review the results at the end. The Wizard provides a simple count of successfully sent/failed emails. If the failure count isn't zero check the logs for details. Once the mailing completes the Wizard provides 3 logs. To access these click on the
Full Log - A complete unfiltered dump of the mailing log. This is the same information visible from the Wizard interface. Errors/Warnings - A log showing only error/warning reports if any. This is perfect to quickly review errors. If the wizard encounters a transient error condition (such as internet disconnection) here we find the list of recipients whose email failed delivery. Sent Email Recipient List - This log file lists all recipients to whom an email was successfully sent. It's a plain dump of email addresses without any other text.
My Technical question is not answered in this FAQ Email to: support@windeveloper.com
Getting the free 1 year license is simple. Just register at the download form, complete the download and install. The Installation will start you off with a 30 day evaluation but within 24 hours you will get the license emailed straight to your Inbox.
Are there any limitations when using the Free License? Don't use for spam. Don't do anything illegal or that breaches the rights of third parties. That's all.
What happens when my Free License expires? We will be providing license renewal options in the future. Contact us if you have any specific requirements.
My Licensing question is not answered in this FAQ Email to: sales@windeveloper.com
|